|

|
Auto Paint Product
|
Auto Paint
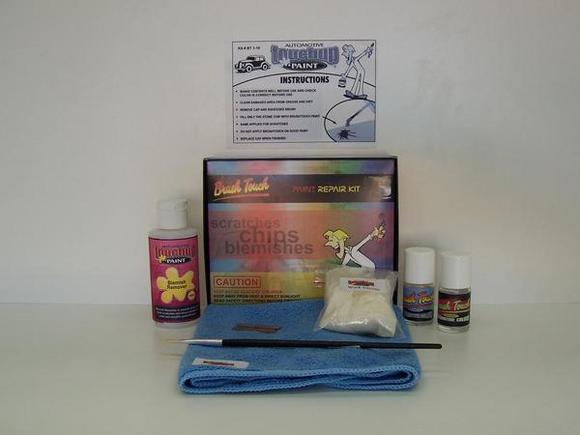
Car Paint Repair Product: keeps your valuable items in pristine condition with its ability to keep up the maintenance caused by everyday wear and tear on the australian roads. Make no mistakes using this excellent approved automotive paint repair product.
Included:
Blemish Remover 100ml, Plastic Primer 15ml, Factory Color 15ml,
Gifts:
Polish Cloth, Work Gloves, Extra Medium Brush, Razor Blade, Step Instructions, Tool Caddy
Directions Auto Paint:
TWO STAGE AUTO PAINT NON-METALLIC REPAIR SYSTEM FOR ACCURATE & EXCELLENT RESULTS
Auto Paint Product Repair Procedure: The two main types of scratches that occur in non-metallic paint. The first type of scratches are light brushed scratches where only the paint color layer is scratched but not pierced. These types of scratches are light and whitish looking. These usually can be removed with the first two steps in this manual. The other type of scratch are deep & discolored where the either metal or plastic surface is visible and will require the first 2 steps (stage 1) of this user guide followed by primers & color.
Stage 1: Your car is painted in layers from the factory so when your paint is scratched there are different levels of damage that occur in a single impact. Stage 1) light scratches where only the colour is damaged and needs the first 2 steps of this non-metallic repair manual to either completely remove the scratch or camouflage it so it is barley noticeable.
Stage 2) Where primers & colour layers that are completely removed and either bare metal or bare plastic is exposed the appropriate paint layer needs to be applied in the same way the factory formula is sprayed. So Basically fix the light scratches first using stage 1 & then using stage 1 & stage 2 together to repair, remove & camouflage heavier paint chips, scratches & blemishes.
Stage 1 Auto Paint Repair
1) Clean Up - Non-Metallic:
Definition Use: Clean-up auto paint is a product solvent solution that does a number of tasks when used within our car touch up paints scratch removal kits. Remove impact residue (whatever hit your car left its mark or smear behind). Clean up will only remove nitrocellulose or rubber residue along with road grime and other various types of industrial fall out. If the residue is enamel and can’t be removed then blemish remover or quick cut polish will be required. Clean-up / solvent is a high grade paint thinner that is used to thin your factory exact match factory paint products & also is used for cleaning brushes, spills & other.
Procedure: Always check in an inconspicuous area first to make sure the part being repaired is not refinished in nitrocellulose paints. Apply a generous amount of clean-up auto paint to the work cloth that is included free in the paint kit. Hold the moistened work cloth against the repair area for a short seconds where impact residue is visible. Proceed to massage the whole damaged area cleaning impact reside and other industrial fall out, swirls and blemishes. If the clean-up does not remove the impact marks use blemish remover or quick cut polish.
Clean-up Tips & Tricks
Solvent / Clean-up is the first step in any touch up paint scratch or paint chip repair as it removes most residue transfer and prepares the repair area for next step in repairing scratches & stone chips.
2) Blemish Remover - Non-Metallic:
Definition Use: Auto Paint blemish Remover is a very fine Sand Paper in a cream form and is used to polish out light scratches, swirl marks & minor residue in painted surface.
Procedure: Apply a small amount of auot paint blemish remover cutting agent to the polish cloth. Massage the scratch and surrounding area removing minor residue and fine scratches caused by impact of a foreign object. Blemish remover will remove and prepare bare metal surface that has been exposed to the weather and has the initial of rust corrosion. Polish until a high gloss is reached on and around scratched paint damaged. Note: If the Impact paint transfer Residue Will Not come Off, Use Colour Touch Up To Camouflage. Please be aware that Quick-Cut polish kit selection should be used if there is heavy scratching in the paint.
Blemish Tips & Tricks
When light scratching can be seen in non-metallic paint surfaces always try to remove the scratch first without painting. Using our quick cut or blemish remover will be able to polish out light scratching. Be generous with the cutting cream and be persistent with attempting to remove paint scratching. We recommend with light scratching in the colour you use & apply the Blemish Remover or Quick-Cut 2 or 3 times.
Stage 2 Auto Paint Repair
Where the paint has been completely removed use stage 1 and stage 2 together
Apply the primer to bare metal chips and larger scratches without getting it on the good paint. Apply the primer only where it is missing and bare metal can be seen. Do not use metal primer on plastic parts unless the plastic primer adhesion promoter has been applied first.
3) Plastic Primer - Non-Metallic:
Definition Use: Plastic Primer is used to promote adhesion between the plastic surface & applied top coat paints where the paints have been completely scratched by impact of foreign object. Failing to apply the plastic primer before painting will lead to a failed long term touch-up repair.
Procedure: Shake plastic contents well, remove cap and squeegee brush. Apply plastic primer only on the damaged area where bare plastic is showing. Apply one coat only. Allow 3 minutes drying time in good weather between top coat paints.
Plastic Primer Tips & Tricks
Do not use plastic primer on metal surfaces. Always use in a well ventilated area and wear eye protection & gloves.
4) Paint Color - Non-Metallic:
Definition Use: colour product is used to cover deep discoloured scratches, chips & paint defects caused by impact of an object where colour coats are completely removed and/or left paint transfer that is impervious to solvent & is to thick to remove using cream cutting agents. If sanding is required then Aerosol spray should be used.
Procedure: Shake colour contents well. Remove cap and squeegee brush. Check the colour is correct. Apply 1 to 2 coats of colour Brush Touch only to the fully discoloured areas of damaged paint where the paint layers including the colour coat has been completely removed. Allow 3 minutes drying time in between coats in good weather. If you have impact residue that did not come off in earlier steps, apply one or two coats of colour directly on only the discoloured areas.
Paint Color Tips & Tricks:
Always know your paint layers and make sure your not touching up scratches with the incorrect paint product or the scratch will look just as bad as the original scratch. You can usually tell which layer the scratch is in when using the Solvent or Clean-up solution. As the solvent is applied it will give the area a wet look. While it is wet if the scratch disappears that usually means that your paint scratch is confined to the top coat layer of the paint colour and Clear Gloss should be used.
Paint Code Locations:
Alfa Romeo Audi Bmw Chrysler Citreon Daewoo Daihatsu Ferrari Fiat/Lancia Ford Holden Honda Hyundai Jeep Jaguar Kia
Lamborghini Land Rover Lexus Mazda Mercedes-Benz Nissan Peugeot Porsche Rolls-Royce Saab Subaru Suzuki Toyota Volvo
Volkswagon
|
|
HOW DO I KNOW WHAT PAINT REPAIR KIT I NEED?
|
In most kits there are few standard items like, work cloth, polish cloth, large brush, gloves, instructions and a tool caddy. It is the actual paint and cleaning products that are what you need to decide on. Simply read what each product does and you should be able to work out what you need depending on what your paint damage looks like. Most common kits are listed on homepage.
|